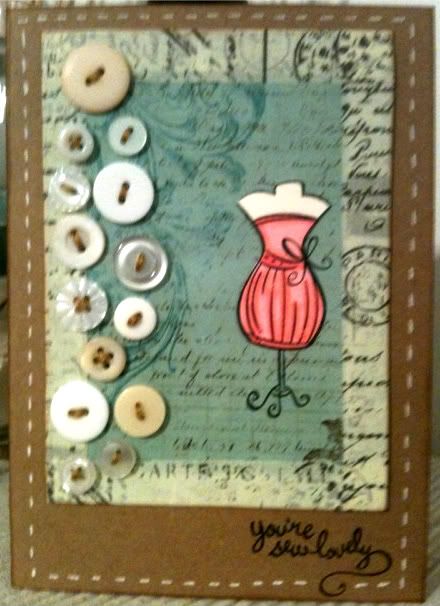
That's why I love Lawn Fawn stamps! They have adorable stamp sets with cute witty puns to accompany them. The dress form and sentiment that reads, "You're sew lovely" is from their Sew Lovely stamp set. I stamped the dress form stamp on a piece of Bo Bunny Gabrielle (I love this line, especially since it uses my name!) card stock then stamped it twice on a piece of vanilla card stock. Then I colored in just the dress with Copic markers and cut it out. I cut out the other image I stamped of the same dress form plain without coloring. I adhered the plain cut image to the stamped image on the Gabrielle card stock then layered the colored in image on top to give it a little more depth. I knew the buttons would have a lot of dimension and that the paper pieced dress form needed to pop too.
My other craft love is Tim Holtz. I love his innovative items and the cool vintage feel a lot of his works have. So with this card I added tissue tape around the edged of the Gabrielle card stock then lightly edged it with a smidge of his Vintage Photo distress ink.
Then came the tedious part of arranging all those buttons and then sewing them on with embroidery floss. If you're ever going to apply this many buttons on a project, make sure to arrange them first and take a quick photo with your cell phone or digital camera. This way you can check periodically to make sure you're applying them they way you wanted them to be. I used some Doodlebug buttons, some Close to My Heart buttons, and some super cool vintage buttons from a boot sale my friend went to in London, England. It's basically they're idea of a swap meet/garage sale, but out of the boots (trunks) of their cars. She gave me a huge sack of vintage goodies for my birthday and I have been having so much fun with them!
After I was done sewing on all the buttons I placed it on top of my kraft card to see where I wanted to stamp the sentiment. I stamped the sentiment then went to the fun part of applying enough adhesive to the back of the card stock to make sure it would stick well to the card base with the weight of the buttons. I first adhered the left over edging of a pack of foam adhesives I had finished off to the opposite side of the buttons. The bulk from the knots on the back of the buttons would have made the card stock lay uneven when I adhered it to the card, so this way using the excess from the left over scraps of foam balanced it out on the opposite side. Then I went hog wild applying tape runner adhesives and glue dots. It stuck really, really well.
Lastly I went around the card with white opaque gel pen for faux stitching and edged the kraft card with a smidge more of Tim's distress ink in vintage photo.
Thank you so much for dropping by and again, I'm new to this so please let me know how I'm doing. :)
Inky and glittery fingers for all!
Gaby
ETA: Yay, this project won for the Challenge #6: The Retro Look at Two Peas!
VERY cool! I love all of those buttons. I thought I was the only one who took pictures along the way to help me remember where to put everything. Ha!
ReplyDelete