Sunday, July 24, 2011

Dusted off the ole Cricut for a Lawnscaping Challenge

Pin It

The LawnScaping challenge was to create a scene with stamps. I was really inspired by Britta Swiderski's card with all the trees. So I choose an out door whimsy scene with birds carrying the banner ala Cinderella with one single giant tree. :) I haven't been using my Cricut that much lately, but I dusted it off for this card for the challenge. When I bought my Cricut a couple years ago it came with the Every Day Paper Dolls cartridge. I really didn't think I'd use it that much as paper dolls aren't really my thing. However, this cartridge comes with a lot of other shapes and I've used it way more than I thought I would. The tree is what I cut out for this card on my Cricut. I cut it out twice. On one tree I colored in the trunk with about three different brown Copic markers to give it a nice wood grain look. On the other tree I colored in the tree top with three green Copic markers in circle strokes to give it some dimension for the leaves. I sewed on a few flower shaped buttons. Then I cut off the trunk part and glued the tree top to the piece that had the tree trunk I had previously colored in. Not only was this easier to color by cutting it up, the layering of the tree top on the trunk definitely gave it a cool look.

I took the card base and glued on a Jilly Bean Soup piece of card stock (corn kernels) that had clouds on it. Then I took a piece of vinyl ribbon and went over it with the same three green Copic markers and drew on vertical lines in fast swipes to mimic grass blades. After, I cut it with scissors vertically on the top and then went back sideways to cut a little more to make it really look like grass and glued it to the bottom. I didn't put glue on the upper third of the ribbon with the grass blades so that it could still move. I pulled back that top third of the grass and stamped the six flowers from a Close to My Heart stamp set. After that I stamped those same flowers on white card stock and colored them in with Copics. Then cut them out and paper pieced them on top of the stamps I had stamped under the grass. I finished off the daisies with a few Doodle bug yellow gems. Lastly, I pulled back the grass for the very last time and adhered the tree to the card.

The last thing I did was stamp Lawn Fawn's banner and the birds that come with the same set on white card stock. I colored the banner in with Copics and stamped Lawn Fawn's stamp set, Sophie's sentiment's "Happy Birthday" in the banner. And then adhered them with foam adhesives to make it look as if they were floating over the (paper) sky. I really love these two stamp sets and use them a lot with my card making, as well as scrapbook pages!

So, yay ...I got to use cloud paper, again! Did I mention that it's kind of been my thing as of late? Oh and buttons, I seriously love buttons! I got a huge sack of these small flower buttons on Etsy for $14. I think there were about 1, 500 of them in the lot. I've been using them slowly but surely!

Thanks so much for dropping by!

Inky and glittery fingers for all!
Gaby

Thursday, July 21, 2011

I really love puns ...

Pin It

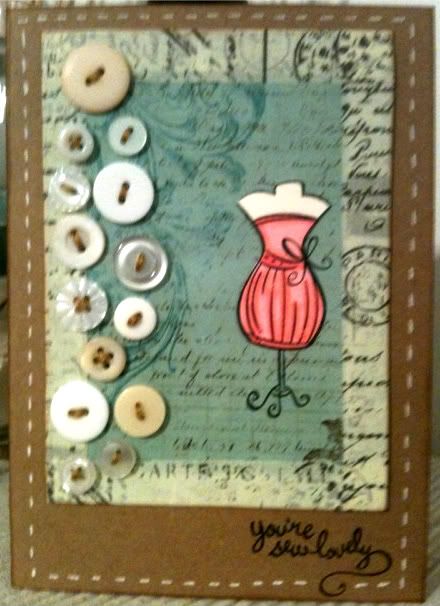
That's why I love Lawn Fawn stamps!  They have adorable stamp sets with cute witty puns to accompany them.  The dress form and sentiment that reads, "You're sew lovely" is from their Sew Lovely stamp set.  I stamped the dress form stamp on a piece of Bo Bunny Gabrielle (I love this line, especially since it uses my name!) card stock then stamped it twice on a piece of vanilla card stock.  Then I colored in just the dress with Copic markers and cut it out.  I cut out the other image I stamped of the same dress form plain without coloring.  I adhered the plain cut image to the stamped image on the Gabrielle card stock then layered the colored in image on top to give it a little more depth.  I knew the buttons would have a lot of dimension and that the paper pieced dress form needed to pop too. 

My other craft love is Tim Holtz.  I love his innovative items and the cool vintage feel a lot of his works have.  So with this card I added tissue tape around the edged of the Gabrielle card stock then lightly edged it with a smidge of his Vintage Photo distress ink.

Then came the tedious part of arranging all those buttons and then sewing them on with embroidery floss.   If you're ever going to apply this many buttons on a project, make sure to arrange them first and take a quick photo with your cell phone or digital camera.  This way you can check periodically to make sure you're applying them they way you wanted them to be.  I used some Doodlebug buttons, some Close to My Heart buttons, and some super cool vintage buttons from a boot sale my friend went to in London, England.  It's basically they're idea of a swap meet/garage sale, but out of the boots (trunks) of their cars.  She gave me a huge sack of vintage goodies for my birthday and I have been having so much fun with them!

After I was done sewing on all the buttons I placed it on top of my kraft card to see where I wanted to stamp the sentiment.  I stamped the sentiment then went to the fun part of applying enough adhesive to the back of the card stock to make sure it would stick well to the card base with the weight of the buttons.  I first adhered the left over edging of a pack of foam adhesives I had finished off to the opposite side of the buttons.  The bulk from the knots on the back of the buttons would have made the card stock lay uneven when I adhered it to the card, so this way using the excess from the left over scraps of foam balanced it out on the opposite side.  Then I went hog wild applying tape runner adhesives and glue dots.  It stuck really, really well. 

Lastly I went around the card with white opaque gel pen for faux stitching and edged the kraft card with a smidge more of Tim's distress ink in vintage photo. 

Thank you so much for dropping by and again, I'm new to this so please let me know how I'm doing.  :)

Inky and glittery fingers for all!
Gaby
ETA: Yay, this project won for the Challenge #6: The Retro Look at Two Peas!

Sunday, July 10, 2011

My favorite card that I've made, so far ...

Pin It

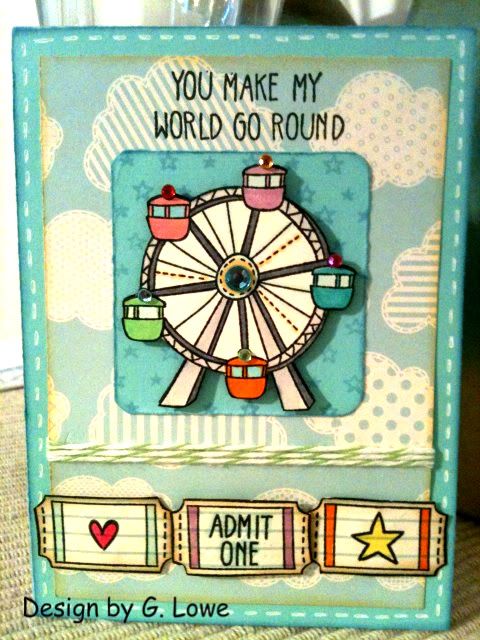
So I've been a wee bit obsessed with cardstock with clouds on it.  I've been incorporating it on a lot of my projects.  I made this card's cloud background with Jilly Bean Soup's corn kernels cardstock, which also has an adorable white flowers on solid green pattern on the other side.  I went around the cloud cardstock's edge with my Tim Holtz foam tool and added a hint of color to give it dimension.  You'll notice I do this on almost all my projects.  It was the very first technique I learned when I started scrapbooking and I just love it!  I put the cloud cardstock on top of some Bazzill's Basics card stock in aqua and then layered on another layer in that same aqua colored Bazzill cardstock that I stamped with Lawn Fawn's tiny backdrops.  Using the Lawn Fawn 'Admit One' stamp set I cut and pieced the tickets and ferris wheel after I colored them in with Copic markers.  Using different sizes of foam adhesives I adhered them to the card.  Before taping down all the layers I wrapped some baker's twine around the cloud cardstock just to give it a lil something, something.  Finally I attached the lil Doodlebug gems and went around the bottom layer of aqua cardstock with a gel pen for a faux stitching look.

Five things I'm obsessed with right now:
Cloud cardstock
Lawn Fawn stamps
Doodlebug gems and buttons
Copic markers
Foam adhesives

If you have any questions about this card or any of the products I used, please don't hesitate to contact me.  Thanks so much for reading my latest entry.  Please subscribe to my blog if you're feeling frisky.  :)  Any crittiques are very welcome.  Seeing as this is my first blog ever, I could use all the advice you can toss my way.

Inky and glittery fingers for all!
Gaby
Saturday, July 2, 2011

Lets take it from the top ...

Well lets see ...I've been scrapbooking for about two years now.  I started card making for a nonprofit called Operation Write Home (www.operationwritehome.org) after my friend Tamra told me about them.  They have people hand make cards to donate to the troops overseas to send back to their loved ones at home.  Often time there's nothing to write a letter home when you've left the wire and you're out in the thick of it, other than the packaging that comes with your MRE (meals ready to eat). Plus as someone who knows what it's like to have a husband in Afghanistan and Iraq, receiving a hand written note or card means so much!

So far I've made 75 cards all by myself, which gets costly.  So I started an Etsy shop (http://www.etsy.com/shop/kittychat)  to sell a few cards here and there to make a lil extra to help offset the cost.  In reality it's probably costing me more to sell them, but the high from selling a card to a complete stranger is pretty awesome.  haha.  Maybe once I establish a rapport with the Etsy community maybe I can up my prices a little to actually make a profit. 

I also love love love to scrapbook.  It's a sickness I tell ya!  In my less than two years doing it I've already filled five books!  Now I've found a bigger binder like book that can hold more than the standard book.  Hopefully I can stop myself from having a gazillion books and maybe only a million now.  It doesn't help (oh but it really does!) that I've been taking online scrapbooking classes with videos from Two Peas in a Bucket.  The ladies that run the classes are so inspiring!  I am becoming so much better at scrapbooking and card making from all their innovative techniques!

Thanks for reading my boring blog.  Maybe I'll get with the program and take it to another level soon.


Inky and glittery fingers for all!
Gaby