Showing posts with label Winner. Show all posts

Sunday, March 31, 2013

Chevron Embossing Folder Winner!!

The winner chosen by Random.org is ...
comment number six, Barb!!

Barb, please e-mail me at gabylowe at gmail dot com with the address of where you'd like
 your prize sent. 

Thank you everyone for entering, please be sure to check back every so often as I try to have giveaways every couple of months.

Inky and glittery fingers for all
-Gaby

 *I did not count the comments from those who were not followers of my blog when counting comments.  Comments were counted in the order they were posted.  Please see random.org for more info.  

Tuesday, October 30, 2012

Winner!

Amy Jones, you are the winner of my blog candy!  You have till November 5th to contact me with your mailing address at 
gabylowe at gmail dot com

Thank you everyone for entering my blog candy giveaway!  I always have something up my sleeve to giveaway, so please check back every now and again or follow me on my Facebook page , where I always post my giveaways.
Congrats Amy!

Inky and glittery fingers for all!
-Gaby

Wednesday, March 28, 2012

Sweet Stamp Shop: Sentimental Birds

I made this card using Sentimental Birds from Sweet Stamp Shop. When I saw SSS was teaming up with CAS-ual Fridays I was beyond excited that I could enter this card into both challenges! Yay! CAS-ual Fridays' challenge was to make a CAS card that featured soft pastels with black: The Bold & The Beautiful! So I decided to make my bold with black embossing powder and my beautiful by painting with mists and white washing with Tim Holtz Distress stain in Picket Fences. Once the paint dried I adhered black and white washi tape to the edges to make a frame. Then I stamped a sentiment to the flag and affixed it to the cardstock with a black brad.


Thanks so much for stopping by my blog today!

Inky and glittery fingers for all!
-Gaby

ETA: Yay! This card won the grand prize over at Sweet Stamp Shop!!

Friday, October 28, 2011

4x6 Photo Love, September

Photobucket
Pin It

This month for Shimelle's 4x6 Photo Love class she had us do a pocket with two strips of paper that had two photos on each side of the strips totaling eight photos with one last photo on the front of the pocket. She used tabs on the tops of the strips to make it interactive, so that the viewer of the scrapbook could pull out the strips easily for viewing.

First thing I did was cut a Hambly woodgrain overlay in half and sew it to the plaid paper. I didn't sew it completely up the sides. I left about a half an inch of room so I could attach some Mixed Tape in woodgrain from Amy Tangerine to define the pocket.

Photobucket


I chose to use a piece of grosgrain ribbon stapled into place and attached snow flake die cuts from a Tim Holtz Bigz die covered in diamond stickles to hide the staples.

Photobucket


I also die cut some brackets to frame the title and added a three snowflakes.

Photobucket

Photobucket

Photobucket

Photobucket


And here's the two strips back and front.
Thanks so much for stopping by and having a looksie! :)

Inky and glittery fingers for all,
-Gaby

As a girl from Hawaii, I still get super excited when it snows here in coastal NC. :) Sure it melts within 24 hours, but it's super fun and Roxy the shiba inu loves snow so much, Pluto the kitty ...not so much! ;)

ETA: Winner of September's 4x6 Photo Love class challenge at Two Peas in a Bucket! :)

Wednesday, September 7, 2011

Products you love every which way, August

Pin It

Shannon Tidwell teaches this monthly class at Two Peas In a Bucket that focuses on one different scrapbooking product each month. For August's class it was stamping.
Pin It

I finally got my hands on the elusive Hero Art's woodgrain stamp and I was dying to use it! It's a humungo stamp that's about as big as a standard greeting card. I knew I wanted to use it on a die cut of some sort. I chose a heart (awww, so sappy) because the picture I used for the layout is of my husband and I on the beach after our friend's vow renewal on Folly beach in SC. Love was in the air, what can I say? I die cut the heart with my Cricut and stamped it with Versa Mark ink then poured sea foam embossing powder on it. After tapping off the excess embossing powder I heat embossed it. Lastly I edged it with my favorite ink of all time, Tim Holtz's Vintage Photo Distress ink. After this step I knew I wanted to do the whole page white washed Carolina beach style ....and that is how the page was born. To start of the white washed look I mixed Jenni Bowlin's Malted Milk acrylic paint with Parrot color glimmer mist and dry brushed a square on kraft cardstock. Then I cut down a piece of cardstock that had a mish mash of text on it that was white washed and misted it with both Peacock and Apricot glimmer mists and let dry.

Pin It

For another stamping technique I used Lawn Fawn's teeny tiny backdrop hearts and stamped it on Prima's canvas tape with brown Stayzon ink. After matting my two pictures with a Pink Paislee Orange Nantucket paper and adhering them to the page I put down the stamped canvas tape in the middle of the page. Then I decided to go hog wild with the sewing machine stitching over and over again to give it more of a worn feel. After I put down my woodgrain die cut heart and went from there. I distressed the Amy Tangerine die cut camera with some of the paint I used earlier and filled in the heart with the same paint. Then stamped Ali Edwards 2011 stamp on a sticker, cut it out and adhered it to the top of the heart.

Pin It

On the other side I used a Jenni Bowlin days of the month bingo card and thought it would be cute to dab on some blue distress ink on the 21 (the day of the month the picture was taken) as if it were those bingo dot paint things they use to mark the numbers. It took a while, but I decided on the yellow Nantucket die cut from Pink Paislee and distressed it like I did the camera and then adding some Vintage Photo (ha, what else is new?) distress inks to the very edge. I wanted to give it a lil more depth so I added a paper clip from Stamp'n up and a tin from October Afternoon to top it off. Lastly I added the chipboard letters.

Thanks so much for dropping by!

Inky and glittery fingers for all!
-Gaby

ETA: Yay this project won the challenge at Two Peas! :)

Thursday, July 21, 2011

I really love puns ...

Pin It

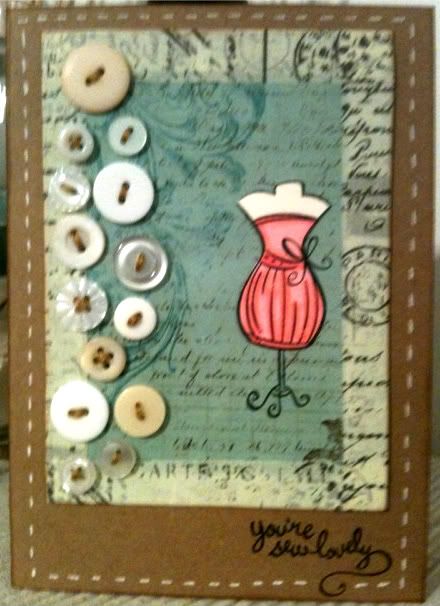
That's why I love Lawn Fawn stamps!  They have adorable stamp sets with cute witty puns to accompany them.  The dress form and sentiment that reads, "You're sew lovely" is from their Sew Lovely stamp set.  I stamped the dress form stamp on a piece of Bo Bunny Gabrielle (I love this line, especially since it uses my name!) card stock then stamped it twice on a piece of vanilla card stock.  Then I colored in just the dress with Copic markers and cut it out.  I cut out the other image I stamped of the same dress form plain without coloring.  I adhered the plain cut image to the stamped image on the Gabrielle card stock then layered the colored in image on top to give it a little more depth.  I knew the buttons would have a lot of dimension and that the paper pieced dress form needed to pop too. 

My other craft love is Tim Holtz.  I love his innovative items and the cool vintage feel a lot of his works have.  So with this card I added tissue tape around the edged of the Gabrielle card stock then lightly edged it with a smidge of his Vintage Photo distress ink.

Then came the tedious part of arranging all those buttons and then sewing them on with embroidery floss.   If you're ever going to apply this many buttons on a project, make sure to arrange them first and take a quick photo with your cell phone or digital camera.  This way you can check periodically to make sure you're applying them they way you wanted them to be.  I used some Doodlebug buttons, some Close to My Heart buttons, and some super cool vintage buttons from a boot sale my friend went to in London, England.  It's basically they're idea of a swap meet/garage sale, but out of the boots (trunks) of their cars.  She gave me a huge sack of vintage goodies for my birthday and I have been having so much fun with them!

After I was done sewing on all the buttons I placed it on top of my kraft card to see where I wanted to stamp the sentiment.  I stamped the sentiment then went to the fun part of applying enough adhesive to the back of the card stock to make sure it would stick well to the card base with the weight of the buttons.  I first adhered the left over edging of a pack of foam adhesives I had finished off to the opposite side of the buttons.  The bulk from the knots on the back of the buttons would have made the card stock lay uneven when I adhered it to the card, so this way using the excess from the left over scraps of foam balanced it out on the opposite side.  Then I went hog wild applying tape runner adhesives and glue dots.  It stuck really, really well. 

Lastly I went around the card with white opaque gel pen for faux stitching and edged the kraft card with a smidge more of Tim's distress ink in vintage photo. 

Thank you so much for dropping by and again, I'm new to this so please let me know how I'm doing.  :)

Inky and glittery fingers for all!
Gaby

ETA: Yay, this project won for the Challenge #6: The Retro Look at Two Peas!