Sunday, November 27, 2011

Baby Sister.

Pin It
I took a wee break from making a gazillion and one Christmas cards to do a page for my 2011 album. I didn't really have a plan going into this page, but I liked how it turned out in the end.

Pin It
I have been dying to use the baby girl tickets from Jenni Bowlin and I finally found a good spot for them with this page. I Copic colored in the hair bows and added some cheek circles with a light pink Copic marker. I had a left over die cut woodgrain embossed heart I made for another page, but made it the wrong size. I kept it and thought I'd finally use it to add a touch of "boy" to this girly layout for my nephew, Keegan. I layered everything on top of a Jenni Bowlin bingo card for May. I also painted with Jenni Bowlin's malted milk paint with a dry brush and misted over the paint in blue to make the frame pop a smidge more.

OK, back to making more Christmas cards! It's scary when Thanksgiving has passed and you've only made a small dent into your Christmas cards! I'm such a procrastinator!!

Inky and glittery fingers for all!
-Gaby

Sunday, November 20, 2011

Shimelle Laine Sketch featuring my niece, Savannah.


What really intrigued me about this sketch was the circle element. I had hoards of pink buttons just waiting to be used on pages for Savannah. I also love to buy die cut cardstock that has boarders ...of course I never know what to do with them. I really liked Shimelle's idea of breaking them up and making boxes. So here's what I came up with.


Pin It
I sewed each. and. every. one. of those buttons! Worth it I think. I love how it frame's Savannah's new born picture.

Pin It

There's a small boarder sticker from Studio Calico on the bottom. Layered on top is a tag I cut down that I got from a Studio Calico kit that's by Amy Tangerine. I stamped Savannah's birth date on a Jenni Bowin Ticket with a Smash date stamp. Everything's edges are inked in Tim Holtz's new winter ink stamp pad release in the color of Iced Spruce. I love it so much that I've been cheating on Vintage Photo with it lately. Shhh! Don't tell!

Thanks so much for having a looksie at my blog.

Inky and glitter fingers for all!
-Gaby

Wednesday, November 16, 2011

Cards that Care

Pin It
Cards That Care

Jennifer McGuire and Vera Yates are running a card drive to donate holiday cards to an elderly home. If you have an extra card or two, please think about sending them to this great cause! Click the Cards that Care logo right above to get more details about this great cause!

This card was stamped with Inspired Stamp's Winter Ruth set. It's an adorable set that has interchangeable hands that are holding different winter items. I chose to use the present for this card. I got a chance to try out this snow pen that I've seen out and about in the blog world. It's pretty cool, even better with a lil layer of stickles on it. ;) The snowflake background was made with Lawn Fawn's Making Frosty Friends, Versa Mark ink, clear embossing powder, and numerous distress inks in blue hues. The sentiment was stamped in white acrylic paint on a strip of velum and attached with Tim Holtz's tiny brads. The final touches were some Doodlebug Christmas twine as the bow on the present, stitching lines, and a few Doodlebug jewels on a couple of the snowflakes.

Thanks so much for dropping by! Please do think about sending in a couple cards to the Cards that Care program!

Inky and glittery fingers for all!
-Gaby

Just for funsies ...I know some how my cat is going to repay me dearly for this, but I picked this up at Target today for our Christmas card photo. My darling husband was totes brave for holding him for me! Haha.

Saturday, November 12, 2011

Lawnscaping Challenge 21, Thank you Card ...

Pin It
This week's challenge from Lawnscaping is to make a thank you project. I just got the Making Frosty Friends stamp set on Friday and I've been dying to use it! I was inspired by Lawnscaping's guest designer Jen McGuire's thank you card using Making Frosty Friends. So I figured combining Frosty Friends with the Hello Friend stamp set would make a super frosty themed thank you card!

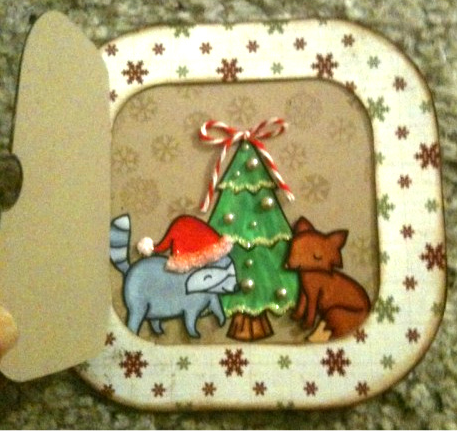
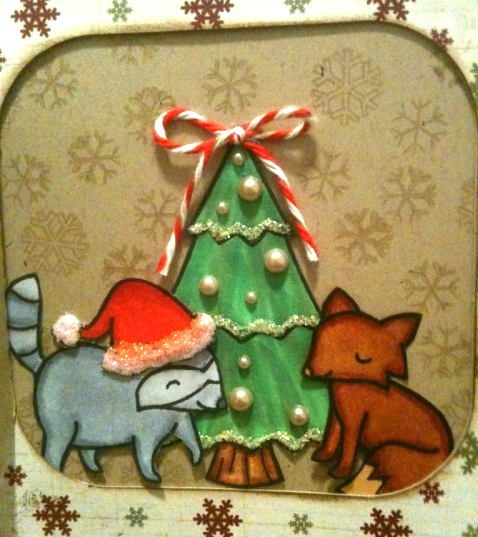
I put a smidge of Copic BG000 Pale Aqua and B00 Frost Blue on some of the snowman's body edges and blended it like crazy with the blending marker to give it an every so slight icey look. The nose and hats were also Copic colored. I also got a spool of Doodlebug Christmas baker's twine from Simon Says Stamp's Ebay store last week and I've been trying to use it as much as I can before the holidays pass us by. I fashioned a scarf for the bigger snowman and a poof for the smaller snowman's hat. While I could of used the button stamp included in the stamp set, I chose to use tiny sticky backed pearls as the buttons for more dimension. For the snow I just freehand cut some hills, edged them with Tim Holtz's tumbled glass distress stain, and added some diamond stickles. ETA: I totally forgot I also used Hats Off to You for the large snowman's hat because I wanted it to be taller than the top hat that came with the Making Frosty Friends set.

Overall I'm pretty happy with how it turned out and I hope you like it too! I'm also super happy that it worked well for another challenge at Jay Gee's Nook! Jay Gee's challenge was to use holiday stamps to make a non-holiday themed card. Thanks so much for having a looksie!

Inky and glittery fingers (for real, I still have glitter stuck to my fingers as I type this) for all!
-Gaby

I was chosen as an Honorable Gnome for this Lawnscaping Challenge

Yay, this card was chosen as an Honorable Gnome for Lawnscaping's challenge.

Favorite Christmas Layout


Shimelle Laine asked her blog followers to post our favorite Christmas project that wasn't new. This is an older page that I made to scrap our Christmas card. I've only been scrapping for two years so I didn't have much to choose from, but this is definitely my favorite.

Thanks so much for stopping by!

Inky and glittery fingers for all!
-Gaby

4x6 Photo Love, October

Pin It
Pin It
This month for Shimelle's 4x6 Photo Love class she had us use page protectors that were divided. I used one that came with my Doodlebug album that has three divided 4x6 landscape slots and one large slot that is 6x6 inches. Since I print my pictures as digital prints my photos are a smidge smaller than 4x6. Therefor I matted the landscape photos before placing them in the slots. For the four portrait photos I placed them on a 6x6 piece of woodgrain cardstock and highlighted it with a strip of forest creature cardstock I bought ages ago because the fox on it reminded me of my dog. I'm glad I finally got to use it!

Pin It
Pin It
Pin It
Pin It
All the little critters on the landscape photos are from three sets of Lawn Fawn stamps. I stamped them in momento ink, Copic colored them, cut and paper pieced here and there. The three Lawn Fawn sets I used were Critters in the Forest, Critters in the Burbs, and Bannerific.

Thanks so much for stopping by and thank you everyone who leaves comments, you're all so sweet!

Inky and glittery fingers for all!
-Gaby

Thursday, November 10, 2011

Interactive Christmas Card

Pin It
Pin It
Pin It
Well we all know how much I love Lawn Fawn stamps ...so when I saw the new challenge at Two Peas for Lawn Fawn Christmas cards, I couldn't resist! I made an interactive Christmas card with four of their stamp sets. The "door" with the wreath is the top layer of my card and for that I used Lawn Fawn's Bows and Holly stamp set. Inside the door I used their Critters in the Forrest for the tree, the raccoon, and the fox. The Santa hat is from their Hats Off to You set. The snowflake background I stamped in Versa Mark on the Kraft paper is from one of their newer sets, Making Frosty Friends.

I cut the card on my Silhouette, but made a couple modifications so that the door was different from the frame on the front and that the inside would be kraft so that it would be easy to write on. Everything was colored in with Copics and paper pieced. Heaps of Stickles were used and plenty of bling and pearl bits were also used.


Pin It
This last picture is just to show you that you can have an interactive card and still have the same amount of room to write a note inside as you would a regular card. You can also substitute the Christmas tree with the animals inside and instead adhere your family photo for holiday cards. The possibilities are endless with this type of card! :)

Thanks so much for stopping by and if you have any questions please don't hesitate to ask.

Inky and glittery fingers for all!
-Gaby

Featured on Fawny Flickr Friday's Blog on 11/18/2011. :)

Monday, November 7, 2011

T is for Tim Holtz

Pin It
The second part of the "T is for" challenge at Two Peas includes Tim Holtz. I first embossed some snowflakes on the Tim Holtz blue paper in silver, gold, and blue embossing powders.

Pin It
I made the snowman from Tim Holtz's Bigz die out of grunge board and grunge paper. I painted his body white with the snow cap paint dauber, his top hat black with the black paint dauber, and his nose orange with the orange paint dauber. Then I sanded the hat a smidge and added Vintage Photo distress ink to some of the bits I sanded off. For the charcoal eye I took one of Tim's long brads and held it with a tweezer, dipped it in Versamark, then sprinkled with black embossing powder and heat embossed it. Please make sure you use tweezers for this step, the brad gets extremely hot! I bore a hole through where I wanted the eye with Tim'z poker tool and placed the brad. I glued all the bits together with glossy accents and adhered it to my page. Lastly I ran a sheet of plastic through Tim's snow embossing folder and set it over the snowman with Tim's brads and washers.

I painted the die cut snowflakes with paint daubers and let them dry. Then I went over the edges with different blue distress inks. Adhered them with glassy accents to the page. All the white snowflakes are Jolee's stickers. I edged the adage ticket with Vintage Photo and stuck it down with Tim's Charm Clips. This was a very simple page, well except for the snowman. I actually didn't want to make it too complicated so that the snowman could shine a bit more.

Thanks for stopping by and if you'd like any more info, please let me know!

Inky and glittery fingers for all!
-Gaby

Sunday, November 6, 2011

T is For ...

Pin It
My entry to Two Pea's, "T is for Tone on Tone" challenge. I used two Lawn Fawn stamp sets: Bannerific and Sophie's Sentiments. The butterfly and flower stamps are from Close to My Heart. The banner has thick foam adhesives behind it and the butterfly has a slightly thinner foam adhesive behind it. I colored everything in with Copic Markers and paper pieced them down. The butterfly and and the daises have Doodlebug gems in the centers. Once everything was in place I took a piece of green vinyl ribbon from BoBunny and cut it up haphazardly with plain ole scissors. However, if anyone has a spare set of the Martha Stewart fringe scissors I will gladly accept them! After I got it just right I drew lines with four different green Copic markers to make faux blades. Since the Copics are alcohol based, they work perfectly on the vinyl. Lastly I drew in a swirl from one of the flowers to the butterfly by making dots with a Sakura Gelly roll black pen and did the faux stitching with a opaque white gel pen.

Pin It
Here's the side view, because everyone needs a side view!

Thanks so much for stopping by!

Inky and glittery fingers for all!
-Gaby

Friday, November 4, 2011

World Card Making Day Entry to Paper Crafts Magazine.

Pin It

I totally forgot to share my entry to the World card making day contest from Paper Craft's magazine on my blog. I almost forgot that I mailed this card in till I saw Paper Craft Magazine's post a few days ago on Facebook. Looks like they have all their winners chosen, which means I'm able to post my project. I didn't win, but I am super proud of my Tim Holtz inspired card I made for the "thinking of You" category. I bought this large Tim Holtz Stamper's Anonymous stamp when my first nephew Keegan was born. Thought I might do a scrapbook page with him and incorporate the stamp, but never got around to it. Always had something else in mind. Glad I finally got around to using it!


As you can see just about everything is Tim Holtz except for a couple Copic markers I used and the plaid paper. This was my first attempt to go "grunge" and I quite liked how it turned out.

Thanks so much for stopping by! Please follow my blog, I will definitely return the favor!

Inky and glittery (err grungy?) fingers for all!
-Gaby

Entire project made with goodies from:
OMC Button2